 Okay I have to admit... I'm a sucker for crystals! I've been collecting them for quite awhile now but as lovely as they are, they can be a bit pricey. So I thought I'd come up with a cheap and easy DIY for crystal lovers out there like me trying to save a couple bucks. So here is my "Clear Quartz" Crystal Moon DIY tutorial! You will need:
 Here are some of the bags of glass pebbles I picked up from the 99 cent store. If you're more of an amethyst person, choose purple! If you're more of an citrine person, choose the amber colored ones! There are so many color options for this project. For this project I've decided on "Clear Quartz", so I will be demonstrating with clear glass pebbles!  Step 1:Before starting the cooking process, prepare a bowl of ice water! Just a medium sized bowl with a handful of ice cubes in it, and place in freezer until needed. We want that water COLD! Then place your glass pebbles in the center of a pan flat side down, with the lid on. Cook the pebbles on high heat for only a couple of minutes. Because my pebbles were a bit bigger in size then usual, I cooked them for approximately 5 minutes. Shut off flame when done. Step 2:After you turn off the burner, grab your ice water from the freezer and set on counter. Lift the lid from the pan and quickly pour the pebbles in the ice water, using the lid as a shield for your face. I've never had a pebble explode on me, but safety first! I also like to place a plate or cool pan lid to place on top of the water bowl immediately after pouring them in. You will hear them crackle like you just poured yourself a bowl of rice krispies cereal. That means they're shattering internally, allowing them to be crushed up finer and easier! Music to my ears. Now dry the pebbles off, dump the ice water and put pebbles back in bowl... Now it's time to crush them up! Step 3:Place pebbles on jeans, the closer they are the better. They tend to shift places when hammering. Wrap up pebbles so they don't spit out crushed bits all over the place. Placing a sheet or tarp underneath is advised, possibly even a face mask, as well as eye protection! Start hammering down the wrapped up area, for about 4-5 minutes. Un-wrap area carefully and check progress. You want them to look like the picture in slide 4. The chunks should be not too big, and not too small. Pour crushed up crystals back in bowl/container, and collecting as much of that fine powder as you can! I held my breath while doing this step as I'm out of face masks... The powder is my favorite part to use in projects, it shines like glitter! Step: 4Grab your cardboard and draw out a crescent moon shape. Cut out the moon as accurate as you can and then paint it white, both sides. Also painting along the edges as best you can. Start mod podge-ing the moon in sections, quickly placing crushed up crystals on top. I've never had an issue using my bare hands with the crushed crystals, but if you'd prefer to use gloves, go for it! Once the moon is fully covered in crystals, drizzle mod podge on top. I like to use a straw to gently blow mod podge in between the cracks but this is not required. Once mod podge is drizzled on top, sprinkle some of that fine powdered dust (at the bottom of crystal container) over moon for that extra shine. Let dry over night or until mod podge is dry and clear. Once the mod podge is dry, gently pick up moon and stand up right, getting rid of excess crystals that did not seal properly. Grab your hot glue gun and start gluing some of the bigger chunks along the edges, covering the cardboard. I tend to pick a chunk of crystal, find the flattest side, and put the glue on that side, pressing it down firmly on the edge. Work your way around until edges are covered. And that's it! You've got yourself a beautiful "Clear Quartz" Crystal Moon. 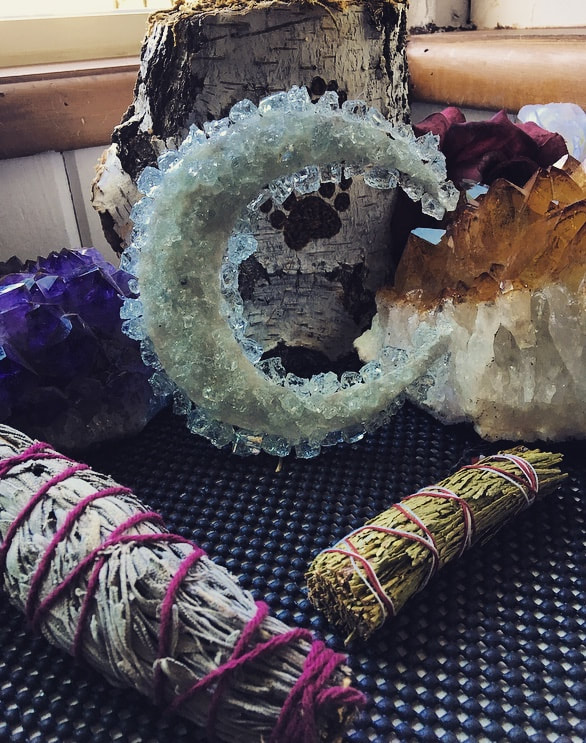 You can add a metal wall hanger on the back if you'd like it to be displayed on a wall, or even glue some string on the back! I prefer mine standing up against my jewelry tree on my desk. Is it perfect? No... But it is a super cheap and easy DIY for crystal lovers and I just love how it turned out. You can use these crystals for a variety of things! I've used them in acrylic geode paintings, mod podge-ing them onto rocks, as well as on wood rounds! SO much fun, and so darling. If you guys decide to follow along, I'd love to see your finished projects! You can send them to my email: [email protected] or tag me on instagram! @sunshinehoney_designs for a shout out! Hope you guys enjoyed this DIY project and until next time...
Much love! Megan
0 Comments
Leave a Reply. |
Sunshine Honey Designs
|

 RSS Feed
